
Beer tasting doesn’t have to be confined to a brewery taproom or a fancy wine bar. One of the most rewarding practices any homebrewer can adopt is creating a proper tasting flight at home—a curated selection of beers arranged to showcase flavour progression, contrast, and the subtle nuances you’ve crafted into your brews. Whether you’re comparing your own batches, experimenting with different yeast strains, or simply exploring a variety of styles, mastering the art of the tasting flight elevates your appreciation for craft beer and teaches you invaluable lessons about balance, complexity, and drinkability.
Why Beer Flights Matter for Homebrewers
A beer flight is more than just a pretty arrangement of glasses. It’s a structured sensory experience that allows you to detect subtleties you’d miss drinking a single beer in isolation. When you taste beers side-by-side in logical order—typically progressing from light to dark, mild to hoppy—your palate learns to appreciate the differences between styles and identify what makes a beer memorable. This practice is central to understanding sensory analysis and quality control, which modern homebrewers increasingly rely upon to refine their craft.
The flight format also encourages mindfulness in tasting. Rather than casually sipping one beer, you’re deliberately evaluating colour, clarity, aroma, mouthfeel, and finish—the very disciplines professional BJCP beer judges use to score competitions. By adopting these habits, you’ll naturally improve your recipes and recognise what’s working in your homebrew setup.
Designing Your Tasting Flight
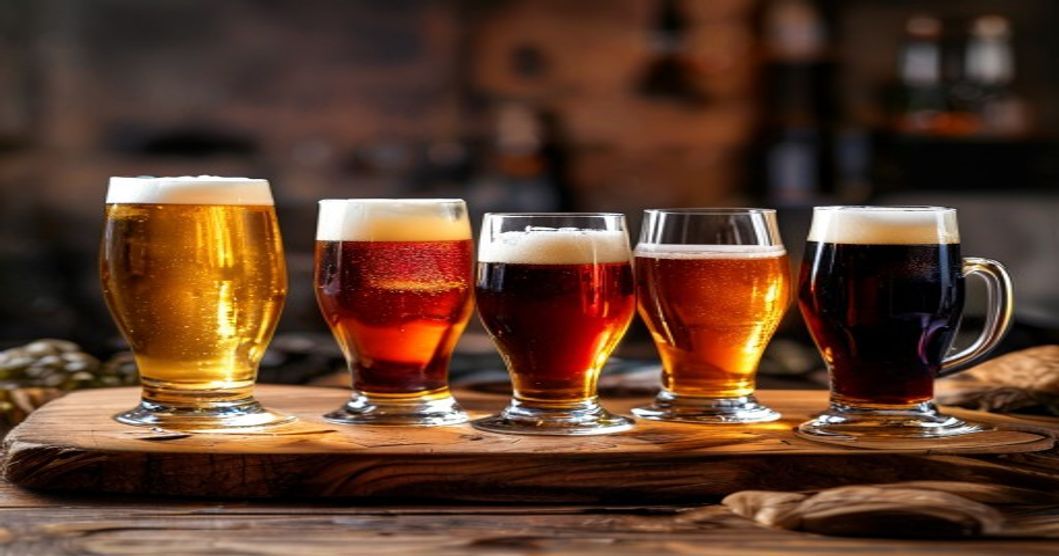
The best flights follow a logic that guides the palate naturally through the experience. Start with lighter beers—pale lagers, session IPAs, or pilsners—before progressing to darker, more complex styles. This prevents your taste receptors from becoming fatigued by heavy, roasted flavours early on. If you’re running a modern home brewery, you’ll likely have a variety of styles at any given time, making it easy to construct meaningful flights that showcase your range.
Consider a classic four-glass flight:
- Glass 1: A light, clean style (pale ale, golden ale, or wheat beer)
- Glass 2: Something hoppy but moderate ABV (session IPA or cascade-forward ale)
- Glass 3: A richer, more malt-driven style (amber, brown ale, or porter)
- Glass 4: Your boldest option (stout, imperial IPA, or barleywine)
Alternatively, you can design thematic flights: a “hop journey” comparing different hop varieties, a “yeast exploration” using the same base recipe with different fermentation techniques, or a “seasonal progression” showing how your recipes evolve throughout the year.
The Technical Side: Glassware & Temperature
The right glassware matters more than many homebrewers realise. Each beer style has an optimal glass shape that influences how aromas reach your nose and how the beer feels on your palate. Tulip glasses work beautifully for complex ales, while straight glasses suit hoppy beers, and snifters concentrate aromas for rich, full-bodied styles. The consistency of your glassware across a flight ensures fair comparison—mixing vessel shapes introduces variables that confuse the tasting experience.
Temperature control is equally critical. Serve lighter beers slightly cooler (50–55°F) to maintain crispness, mid-range ales around 55–60°F, and darker beers closer to cellar temperature (55–65°F) to allow subtler flavours to shine. According to experts at CAMRA, many casual drinkers serve beer too cold, masking the craftsmanship that goes into each brew.
Tasting Protocol: How to Actually Do It
Now that your flight is arranged, approach each beer systematically. Start with appearance: note the colour on a white background, observe clarity, and assess the head formation and retention. Next comes aroma—take a moment to identify hop character, malt sweetness, yeast esters, or any off-flavours. This olfactory stage is crucial; your nose detects far more than your taste buds ever will.
Then taste the beer, letting it coat your mouth and palate for several seconds before swallowing. Pay attention to the mouthfeel—is it light and crisp, creamy, astringent? Finally, evaluate the finish: does the flavour linger pleasantly, or does it fade abruptly? The finish often reveals whether a beer is well-balanced or if certain flavours dominate.
Taking written notes might feel pedantic, but it’s transformative. By recording observations about each beer, you create a reference library that helps you identify patterns in your brewing. Over time, you’ll recognise which yeast strains produce particular esters, which malt combinations create depth, and how your peers on HomeBrewTalk approach similar challenges. This builds genuine expertise rather than just casual preference.
Building a Flight-Tasting Habit
Make flight tasting part of your monthly routine. Invite friends over for a structured tasting evening—it’s educational, social, and far more engaging than sitting around with random beers. Create a score sheet that others can use, and compare notes afterwards. You’ll be amazed at how differently people perceive the same beer and what that reveals about tasting subjectivity.
Many homebrewers also use flights to document their progress: brewing the same recipe quarterly and tasting a flight of successive batches shows evolution, highlights improvements, and identifies what’s working. This data-driven approach—what some call precision brewing—turns hobby into craft.
Conclusion: Elevate Your Tasting Game
Beer flights transform tasting from passive consumption into active learning. By arranging beers thoughtfully, using proper glassware, and approaching each beer with intention, you develop the sensory skills that separate good homebrewers from great ones. Whether you’re comparing your own batches, exploring different styles, or simply deepening your appreciation for craft beer, the tasting flight is one of the most accessible yet powerful tools in your arsenal. Start this week—pour your next flight, grab a notebook, and pay attention. Your palate—and your brewing—will thank you.

